Mahjong Fundamentals 3: Basic Tile Efficiency
In this article we’ll cover some of the basics of tile efficiency and how to best shape your hand to reach a winning shape as fast as possible. First off, some terminology:
Shanten & Ukeire
Shanten and ukeire are two key concepts when talking about tile efficiency in mahjong.The term shanten refers to how far away your hand is from winning, specifically how many steps away your hand is from tenpai (only needing one more tile to win). A hand that is X-shanten needs X more tiles to reach tenpai, so a 2-shanten hand needs two more tiles to tenpai (and three more tiles to win). Typically as we build our hands in mahjong we are looking to reduce our shanten number and progress the hand towards a winning shape.
The term ukeire refers to the number of tiles which will advance the hand forwards and reduce the shanten number by one. In English this is often referred to as ‘tile acceptance’. Typically in mahjong we want to maximise our hand’s ukeire, as this increases the number of potential tiles we can draw that will improve the hand.
Basic Two-Tile Shapes
It’s relatively easy to recognise completed shapes in our hand, however the majority of the time our hand will consist of lone tiles and two-tile shapes. There are four kinds of two-tile shapes in mahjong. The first three are two-tile shapes that have the potential to form runs:
Ryanmen, or two-sided wait protoruns, such as 
 . These have a tile acceptance of 8.
Kanchan, or closed wait protoruns, such as  . These have a tile acceptance of 4.
Penchan, or edge wait protoruns, such as 
 . These have a tile acceptance of 4.
From these three, two-sided wait protoruns have the highest acceptance and therefore are the strongest and most valuable shapes to keep within our hands. Closed wait and edge wait protoruns both have a tile acceptance of 4, however closed wait protoruns are stronger and more valuable than edge wait protoruns because of their ability to form the two-sided waiting shape. For example can complete with if you draw it. However if you draw a it can upgrade to a two-sided wait, and if you draw a  it can become a two-sided wait.
On the other hand, a edge wait cannot improve to a two-sided wait except by first drawing to form a closed wait and then drawing a to become a two-sided wait.
The fourth and final two-tile shape is toitsu, or pairs of tiles, such as . Technically these have an acceptance of 2, which would make them the weakest shape, however your final hand shape needs one pair, and so they are strengthened because they don’t necessarily need to be completed. A hand with a final waiting shape of two pairs (called a shanpon wait) still has a tile acceptance of 4, because it does not matter which of the two pairs gets completed. Having two pairs in the hand is typically good for tile acceptance as they complement each other in this way, and we know we will want at least one pair in the final hand. Three or more starts to become bad for tile acceptance as each extra pair only adds another 2 ukeire, compared to other two-tile shapes that can add 4 or 8.
As a general rule, for best tile efficiency we want to try and aim for two-sided waiting shapes over other potential proto-runs, and to keep one or preferably two pairs in our hand.
As well as two-tile shapes, we often find our hand has more complex shapes consisting of four, five or even more tiles. We’ll cover these in depth in part 8 of this series.
Defining Blocks
We briefly introduced five block theory in the last article, but we’ll go into it in a little bit more depth now.
The core of five block theory is that a complete mahjong hand will typically consist of five blocks: four completed groups of three tiles, plus a pair. To work out the best strategy for tile efficiency, it’s useful for us to mentally break up the hand into these blocks before they are fully complete, as this allows us to better compare our options for what to discard. However when splitting up the hand into blocks, we don’t have to split clusters of tiles into individual blocks, and usually it is actually better for us to consider groups of tiles as just giving us two or even three blocks
Here are a two examples:
Hand 1:
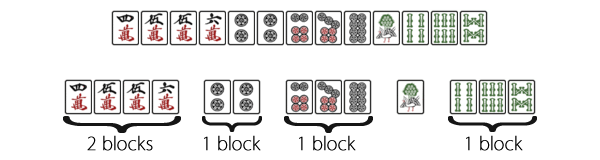
Note that for large numbers of adjacent tiles, we do not have to separate them into single blocks, but can leave them as bigger groups that we expect to be able to form two or more blocks out of. This can help us exploit the versatility of clustered tiles, as there are usually many ways that they can potentially be broken down. In this example the group 

 can be thought of as + (i.e a completed block plus a lone tile), or it can also be thought of as + (two strong side-wait proto-run shapes) – usually for early hands it is better to think of it as the two groups of + , and to not discard the seemingly surplus early on, because it actually adds a lot of potential improvement for the hand.
Hand 2:
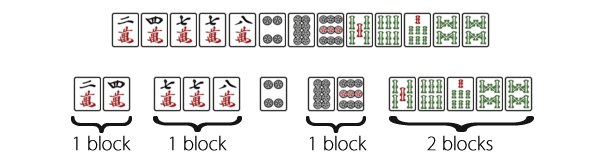
If we split groups of adjacent tiles into individual blocks too early, then again there is potential here to miss opportunities later on for better tile efficiency.
For example in this hand, the 


 group could easily be seen as + . But in this instance if we drew a
  , the group can become + , which is a very strong shape that can accept
  , , and
  to form two complete sets. If we already have mentally decided that the group of tiles is two distinct blocks of a run and a pair, then it would be easy to think of the draw as a spare tile that should be discarded, and miss the potential for a very strong 2-block shape in the hand.
When using the five block method, we should never be too eager to group up individual blocks early when tiles are next to each other. It’s important to always reassess blocks as we draw new tiles, and to recognise when a cluster of tiles that form one apparent block may be able to give us two blocks. It’s never good to decide early that a specific tile will go into a certain block, or that a block will become a certain shape (e.g. a run or a triplet). Allowing tiles and blocks to be flexible is important for good efficiency.
Number of Blocks
Once we’ve mentally worked out where the blocks sit in our hand, we should count how many we have. In mahjong, with the five block method there are three possible scenarios:
1) Hand has fewer than five blocks. In this instance we want to keep the lone tiles that have the highest acceptance to form new blocks. This was covered in the previous article.
2) Hand has exactly five blocks. For five blocks, we want to try and hold tiles that strengthen our existing blocks, potentially keep options open for replacing weak blocks with stronger ones (as we did in the last example in Part 2), or keep safe tiles as loose tiles to discard later.
3) Hand has six blocks. In this instance we should typically look to discard the weakest block.
Let’s take an example of a six block hand:
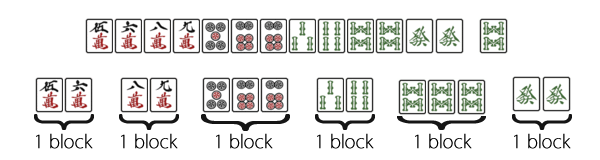
In this hand we have no floating tiles to discard, and we have six blocks – we want to discard one of these blocks to bring the hand down to five, prioritising the weakest block to discard.
Looking at the groups:
can accept x4,  x4, so 8 tiles

 can accept x4, so 4 tiles
can accept x4, x2,  x4, so 10 tiles
can accept  x4, x4, so 8 tiles
is a completed block
 can accept x2, so 2 tiles
In this instance, it would appear at first glance that discarding the would be the best choice, however if we look further, this isn’t the case.
Firstly, the pair of are valuable to our hand – if we can get a third one we’ll have yakuhai, giving us one additional han. By discarding them our hand most likely becomes just riichi and is not going to be worth a lot. That said, even from an efficiency perspective, it’s still not a good discard if we look in more detail at what we lose by discarding the tiles.
By discarding , this hand goes from 2 pairs to 1 pair – we mentioned earlier in the article that we preferably want to keep two pairs in the hand as long as possible. If we throw away the pair of , then it means must become our pair to reach tenpai, which means the hand can no longer accept x4, x2, x4, and we actually lose a lot of potential draws for improvement beyond just the 2 tiles accepted by the block itself. We should keep the to retain two pairs and maintain best tile efficiency.
The other subtle but important aspect is that the four tiles that the block can accept is actually a bit misleading, because it overlaps with the block. If we draw , then we end up with and we still need or another to complete it. On the other hand, without the block the hand can still accept for the block, and so we don’t lose efficiency by discarding it.
So the correct option here is to go from 6 blocks down to 5, by discarding the block. It’s important to try to recognise when tiles clustered together support each other, and provide additional options (as seen earlier with groups like 56788) and when the waits overlap and actually you have conflicting waits that hurt efficiency, as with 56 + 89.
For more on what to do with four/five/six blocks, there are the following articles by Muller:
Application of Block Theory Part 1
Application of Block Theory Part 2
So, whenever we are looking at a mahjong hand and wondering what to discard, the first step is to mentally group the hand into expected blocks and to count how many we have. We can then more easily choose the most efficient discard based on the number of blocks, and the relative strengths and interactions between them.
With this we the article on the fundamentals of tile efficiency. For a more in-depth English presentation of the Five Block Method (and other mahjong strategy), I would suggest reading Daina Chiba’s Riichi Book I. In the next article we’ll look at the other side of the hand-building coin and begin to consider yaku and how best to build value into our hand. In the mean-time, try out the five block method next time you play!